Showing posts with label Dessert. Show all posts
Saturday, December 23, 2017
Bridget's Peppermint Pattys
BRIDGET'S PEPPERMINT PATTYS
1 14 oz can sweetened condensed milk
6 c powdered sugar
1 Tbsp peppermint extract
Mix together and knead until smooth. (Add more sugar if wet). Then roll out about 1/4" thick and cut into circles and dip in chocolate. Sprinkled crushed peppermint candies can be sprinkled on top.
Haylee's Note:
I saw my friend, Bridget, post these to instagram and I REALLY wanted to give it a try, but just the thought of making these seemed daunting.....until she gave me the recipe! They are SOO easy and they turn out SOOOO good!! However, this is a VERY dangerous recipe to have! Enjoy!
Wednesday, October 18, 2017
Blueberry Chia Cookies
BLUEBERRY CHIA COOKIES
Cream:
1 Cup Butter
3/4 Cup Sugar
Add:
1 egg
2 tsp. vanilla
2 tsp. lemon juice
2 tsp. lemon zest
Add:
3 Cups flour
Shape into cookies and gently add a few fresh blueberries.. Bake for 8 minutes at 350. Remove cookies and immediately drizzle with a glaze made from powdered sugar, lemon juice, and chia seeds.
Haylee’s Note:
My sister, Heather, had a cookie similar to this one at a restaurant and came up with her own version. These are AMAZING!!! They are so unique and so delicious!! Give them a try, they won’t disappoint.
Tuesday, December 8, 2015
Grandma Helen's Ginger Filled Cookies
COOKIE:
7 C. flour
1 c. Molasses
1 c. melted shortening
2 tbsp. baking soda dissolved in hot water
1 tbsp. vinegar
2 eggs
2 tbsp. ginger
1 tsp. salt
1 c. Molasses
1 c. melted shortening
2 tbsp. baking soda dissolved in hot water
1 tbsp. vinegar
2 eggs
2 tbsp. ginger
1 tsp. salt
FILLING:
Ground raisins
Thick plum jam
Ground raisins
Thick plum jam
Mix melted shortening, sugar, and molasses. Add remaining ingredients. Roll out dough and cut circles. For the filling, mix the ground raisins and
the thick plum jam together. If the jam
is too thin, add raisins and cook thicker with flour. Put some of the filling in the middle of a
circle cookie, and top with another cookie.
Seal the two cookies together.
Bake at 350 for 10-12 minutes.
Haylee’s Note:
This is Darin’s grandma’s recipe. Darin’s mom makes these every year around Christmas time and they are a family FAVORITE! They always seem to disappear quickly. I haven’t made them myself yet, but I hope to soon!
Monday, June 22, 2015
Family Circle’s Blueberry-Strawberry Shortcake
FAMILY CIRCLE'S BLUEBERRY-STRAWBERRY SHORTCAKE
4 cups all-purpose flour
1/4 cup sugar, plus extra for sprinkling and to sweeten cream
3/4 teaspoon salt
1 cup (2 sticks) unsalted butter, very cold
1 cup solid vegetable shortening, very cold
1/2 cup buttermilk
1 quart strawberries, hulled and sliced
1 quart blueberries
3 cups heavy cream, whipped
1/4 cup sugar, plus extra for sprinkling and to sweeten cream
3/4 teaspoon salt
1 cup (2 sticks) unsalted butter, very cold
1 cup solid vegetable shortening, very cold
1/2 cup buttermilk
1 quart strawberries, hulled and sliced
1 quart blueberries
3 cups heavy cream, whipped
In a large mixing bowl, combine flour, 1/4 cup sugar
and salt. Cut in butter and shortening until mixture resembles coarse sand. Add
buttermilk and mix just until dough comes together in a ball. Divide dough
evenly into thirds; wrap in plastic and refrigerate 2 to 3 hours.
Heat oven to 325 degrees Roll each piece of dough on
lightly floured parchment to a 10-inch circle. Prick with a fork and sprinkle
liberally with sugar. Bake at 325 degrees for 30 minutes.
To assemble: Set aside a few strawberries and
blueberries to top finished dessert. Place one pastry disk on a serving plate
and cover with a third of the remaining berries, followed by a third of the
whipped cream. Repeat layering two more times and finish with reserved berries.
Haylee’s Note:
We loved this dessert! It was delicious! Darin grew strawberries and blueberries in
our garden this year, so I think I will make it again! I think this is a really pretty dessert, and
perfect for a patriotic celebration like 4th of July!
Tuesday, October 28, 2014
Donuts
1 c. mashed potatoes
2 tbsp. yeast
½ c. warm water
½ tbsp sugar
2 eggs
¼ c. shortening
1/2 c. sugar
1 tbsp salt
2 c. scalded milk
6 c. flour
Dissolve yeast in water and add ½ tbsp sugar. Cream ½ c. sugar and shortening then salt and potatoes. Add scalded milk (cooled). Add salt and eggs then flour. Double 1-2 hours roll out and cut. Double again. Fry and glaze while hot. Makes 40
Glaze:
4 c. powdered sugar
½ c. water
½ tsp vanilla
Chocolate glaze:
2 tsp. butter
2 sq. chocolate
1 c. powdered sugar
¼ c. milk
1 tsp vanilla
Melt butter and chocolate. Add remaining ingredients.
Haylee's Note:
These are really yummy and fun to make, even though they are time consuming. Our family always made these on the FHE before halloween and took them to the neighbors. It was a fun tradition. To see some of our neighborhood donut parties, click HERE.
Thursday, September 11, 2014
Peach Pie
PEACH PIE
Double pie crust (recipe below)
1 egg, beaten
5 cups sliced peeled peaches
2 tablespoons lemon juice
1/2 cup all-purpose flour
1 cup white sugar
1/2 teaspoon ground cinnamon
1/4 teaspoon ground nutmeg
1/4 teaspoon salt
2 tablespoons butter
1 egg, beaten
5 cups sliced peeled peaches
2 tablespoons lemon juice
1/2 cup all-purpose flour
1 cup white sugar
1/2 teaspoon ground cinnamon
1/4 teaspoon ground nutmeg
1/4 teaspoon salt
2 tablespoons butter
CRUST:
1 1/4 c flour
1/4 tsp salt
1/3 c shortening
5 T water
1/4 tsp salt
1/3 c shortening
5 T water
Preheat the oven to 450
Line the bottom and sides of a 9 inch pie plate with one of
the pie crusts. Brush with some of the beaten egg to keep the dough from
becoming soggy later.
Place the sliced peaches in a large bowl, and sprinkle with
lemon juice. Mix gently. In a separate bowl, mix together the flour, sugar,
cinnamon, nutmeg and salt. Pour over the peaches, and mix gently. Pour into the
pie crust, and dot with butter. Cover with the other pie crust, and fold the
edges under. Flute the edges to seal or press the edges with the tines of a
fork dipped in egg. Brush the remaining egg over the top crust. Cut several
slits in the top crust to vent steam.
Bake for 10 minutes in the preheated oven, then reduce the
heat to 350 and bake for an additional 30 to 35 minutes, until the crust is
brown and the juice begins to bubble through the vents. If the edges brown to
fast, cover them with strips of aluminum foil about halfway through baking.
Cool before serving. This tastes better warm than hot.
Haylee’s Note:
I don’t think I have ever bought a premade pie crust. The original recipe calls for a store bought one, but I just assume do the work myself—it taste better, it is cheeper, and it is actually really easy. We LOVED this recipe. You can get the original recipe HERE.
Wednesday, September 10, 2014
Peach Dessert
PEACH DESSERT
Crust:
2 packages graham crackers
2/3 c. sugar
3/4 c. square melted butter
Put graham crackers in the blender to make a powder. Add sugar and butter. Mix the press down into the bottom of a 9x13 pan
Filling:
3 oz. cream cheese
1 c. powdered sugar
1 c. whipped cream
1 tsp. vanilla
Mix cream cheese, vanilla, and 1/2 of the powdered sugar. In separate bowl whip the cream. Slowly add the two together and add remaining powdered sugar. Pour filling on top of the crust and add fresh sliced peaches to the top.
Haylee’s Note:
This is one of my favorite summer desserts ever!! Nothing beats juicy, delicious, fresh peaches…except for juicy, delicious, fresh peaches on top of a yummy dessert!! Give it a try, you will be hooked!
Friday, September 5, 2014
Blackberry Ice-Cream
BLACKBERRY ICE-CREAM
1 cup whole milk
3/4 cup granulated sugar
pinch salt
2 cups heavy cream
1 tablespoon pure vanilla extract
1/3 c juice from smashed blackberries
3/4 cup granulated sugar
pinch salt
2 cups heavy cream
1 tablespoon pure vanilla extract
1/3 c juice from smashed blackberries
In a medium bowl, use a hand mixer on low speed or whisk to
combine the milk, sugar and salt until the sugar is dissolved. Stir in the
heavy cream and vanilla. Cover and refrigerate 1 to 2 hours, or overnight. Turn
on the ice cream maker; pour the mixture into the frozen freezer bowl and let
mix until thickened, about 15 to 20 minutes. The ice cream will have a soft,
creamy texture. If a firmer consistency is desired, transfer the ice cream to
an airtight container and place in freezer for about 2 hours.
Haylee’s Note:
This is the Cuisinart Vanilla recipe then I just added the blackberries. Honestly, I think there are better tasting recipes than this, but this one is sure quick and easy and it still tastes really good. You can find the original recipe HERE.
Monday, March 10, 2014
Pina Colada Cake
Cake:
2 cups flour, sifted
1 tablespoon baking powder
1 teaspoon salt
1/2 cup unsalted butter, room temperature
2 cups sugar
1 1/4 cups coconut milk
1 1/2 teaspoons coconut extract
5 egg whites
2 cups flour, sifted
1 tablespoon baking powder
1 teaspoon salt
1/2 cup unsalted butter, room temperature
2 cups sugar
1 1/4 cups coconut milk
1 1/2 teaspoons coconut extract
5 egg whites
Mix flour, baking powder and salt together in a bowl and set aside. Place the butter in a mixing bowl and beat on medium speed with a mixer for 1 minute. Add sugar and beat for another minute. Add coconut milk and coconut extract to butter mixture. Gradually add flour mixture into the butter mixture and beat for 2 minutes. In another bowl, beat egg whites until stiff peaks form. Fold the egg whites into the batter and mix until all ingredients are incorporated. Grease and line two 8-inch cake pans and divide batter evenly between them. Bake in a 350 degree preheated oven for 23-28 minutes until a toothpick inserted in the center of the cake comes out clean. Remove the pans from the oven and place on a cooling rack for 5-10 minutes to cool before removing cake from the pans.
Pineapple Filling:
1 20-ounce can crushed pineapple
2/3 cup sugar
2 tablespoons cornstarch
In a saucepan combine all ingredients over medium heat. Cook, stirring frequently until mixture gets a glossy look. Set aside to cool.
Frosting: 1 8-ounce package cream cheese, softened
2 tablespoons coconut milk
2 cups powdered sugar
1 teaspoon coconut extract
1 16-ounce container whipped topping, or 1 1/2 cups heavy whipping cream, whipped
Beat cream cheese in a bowl until smooth. Add coconut milk, powdered sugar and coconut extract. Mix well and then fold the whipped topping or cream into the mixture.
To assemble, cut both cakes open, making four 8-inch rounds. On top of one, place half the pineapple filling and top with a cake layer. Next add a layer of frosting, then a cake layer. Place remaining pineapple mixture on the cake and top with the last cake layer. Frost the sides and top of the cake. Sprinkle with coconut.
This is best when refrigerated for at least four hours
Haylee’s Note:
Have you ever been to Si Foster’s food blog? You MUST!! If the recipe is on her blog, it is BOUND to
be DELICIOUS!! And her pictures are
AMAZING!! This cake won at the Utah
State Fair. We LOVED it! I did my frosting a little different, because
I like mine a little thicker. To get the
original recipe, and to see other yummy things from Si’s blog, click HERE
Tuesday, November 19, 2013
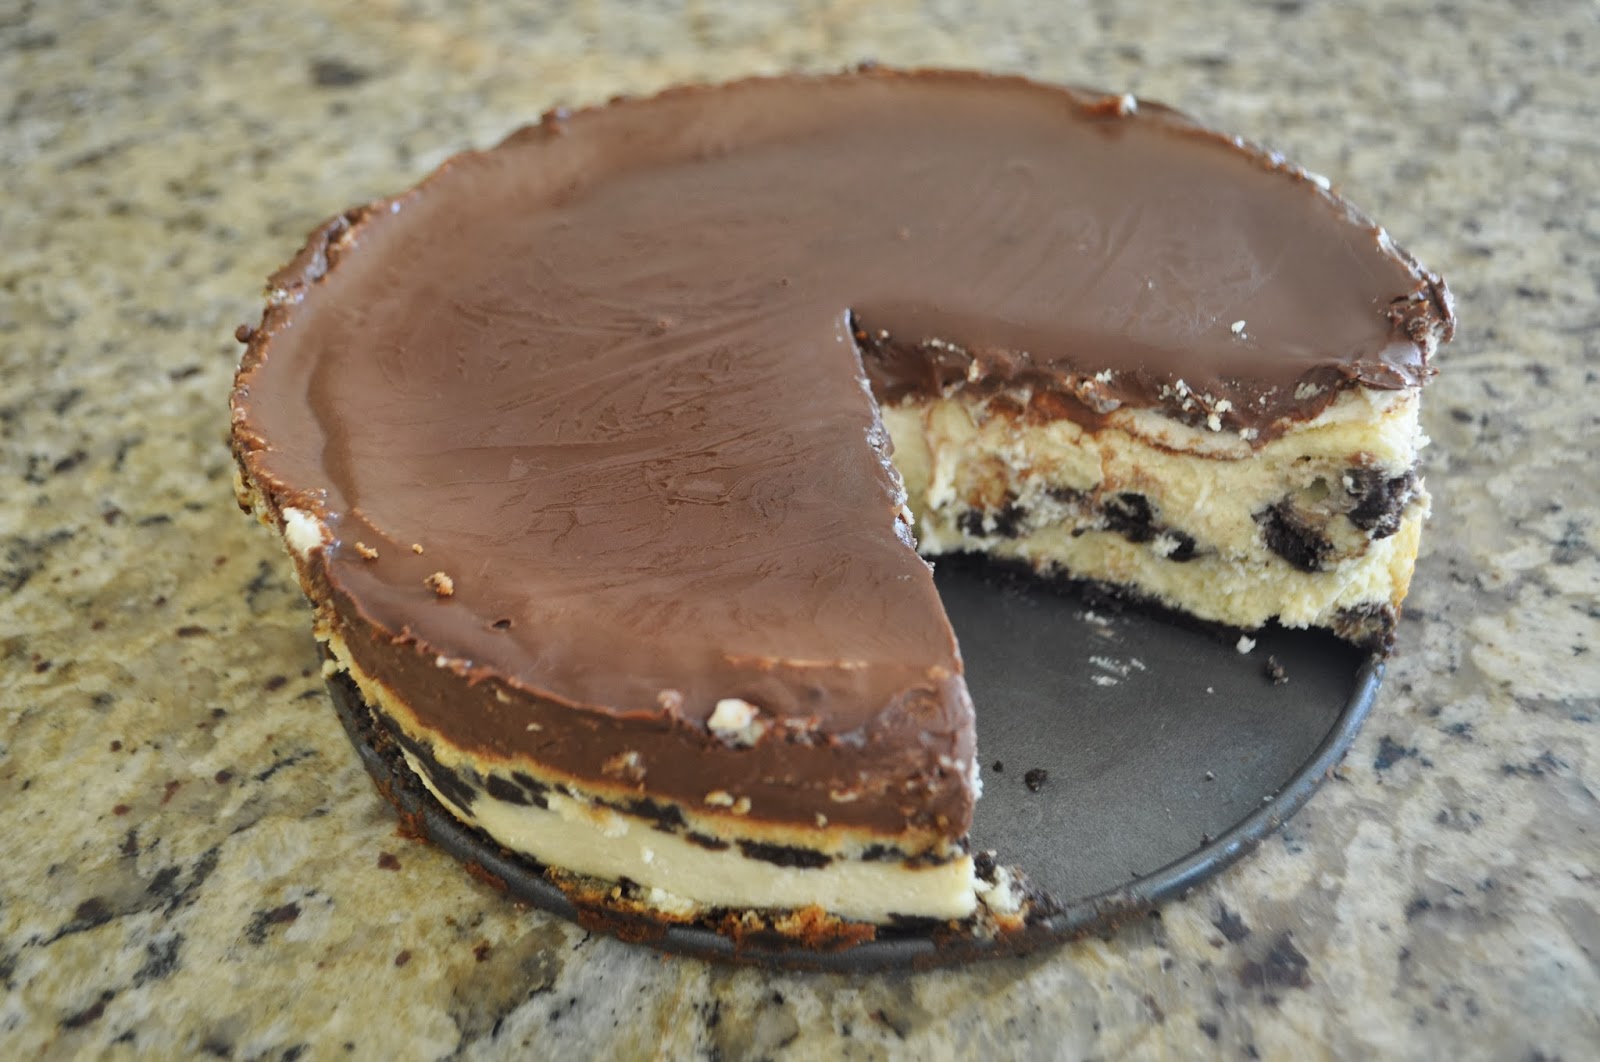
Steve Butter’s Chocolate Cheesecake
STEVE BUTTER’S CHOCOLATE CHEESECAKE
Crust:
1 ½ c chocolate
cookie crumbs
¼ c melted butter
1/8 tsp. cinnamon
(Mix ingredients and press in a 10” spring form pan)
¼ c melted butter
1/8 tsp. cinnamon
(Mix ingredients and press in a 10” spring form pan)
Filling
2 lbs cream cheese (4 packages)
1 ¼ c sugar
4 large eggs
1/3 c whipped cream
2 tbsp. flour
2 large egg yolks
1 tsp vanilla
Whip the cream, then add sugar, then whip, then eggs, then whip, continue to add one ingredient at a time. After filling is fully whipped, pour half of the filling into the pan, then sprinkle with 2 c. chopped Oreos and the pour remaining filling on top.
1 ¼ c sugar
4 large eggs
1/3 c whipped cream
2 tbsp. flour
2 large egg yolks
1 tsp vanilla
Whip the cream, then add sugar, then whip, then eggs, then whip, continue to add one ingredient at a time. After filling is fully whipped, pour half of the filling into the pan, then sprinkle with 2 c. chopped Oreos and the pour remaining filling on top.
Bake at 425 for 15 minutes then reduce to 225 and bake for 1
hour.
Top:
2 c. sour cream
¼ c. sugar
1 tsp vanilla.
Mix ingredients then pour on top. Bake for another 7 minutes at 350, then refrigerate immediately.
¼ c. sugar
1 tsp vanilla.
Mix ingredients then pour on top. Bake for another 7 minutes at 350, then refrigerate immediately.
Ganache :
Mix: 1 c chocolate chips
1 c. whipping cream
1 tsp vanilla
1 c. whipping cream
1 tsp vanilla
Scald the whipping cream then add chocolate chips and
vanilla. Stir for 1 minute, then
refrigerate for 10 minutes, then pour over cheesecake. When cold cover with plastic.
Haylee’s Note:
Cheesecake is not my favorite dessert. But this is without question the best Cheesecake recipe in the history of EVER!! Love love love this!
Thursday, April 4, 2013
Rice Pudding with Blueberry Compote
RICE PUDDING WITH BLUEBERRY COMPOTE
Rice Pudding:
2 c water
1 c rice
1-2 c milk
1/4 c sugar
Pinch salt
1 t. Vanilla
1 t cinnamon
1/4 t nutmeg
1 c rice
1-2 c milk
1/4 c sugar
Pinch salt
1 t. Vanilla
1 t cinnamon
1/4 t nutmeg
Put all ingredients
in pan and cook for 45 minutes on stove, covered
Blueberry compote:
Blueberry compote:
In a separate pan combine:
1 c blueberries (I used canned pie filling)
2 Tbs water
1/4 c sugar
2 tsp lemon juice
Cook for 10 minutes add 1 c blueberries pour over rice and drizzle with sweetened condensed milk. Sprinkle with cinnamon, and serve warm.
1 c blueberries (I used canned pie filling)
2 Tbs water
1/4 c sugar
2 tsp lemon juice
Cook for 10 minutes add 1 c blueberries pour over rice and drizzle with sweetened condensed milk. Sprinkle with cinnamon, and serve warm.
Haylee’s Note:
I got this recipe from my sister, Heather. We all really liked it, and when she made it for a brunch she got rave reviews. Enjoy! (And thanks Heather for another recipe!)
Tuesday, September 4, 2012
Nikki’s Cookie salad
NIKKI'S COOKIE SALAD
1 can manderine oranges
1 can pineapple tidbits
1cup of buttermilk
1 pkg vanilla pudding mix
1 pkg cool whip
1 pkg fudge stripe cookies
1 can pineapple tidbits
1cup of buttermilk
1 pkg vanilla pudding mix
1 pkg cool whip
1 pkg fudge stripe cookies
Dump the pudding mix and buttermilk into a bowl and mix up.
Crush cookies into bite size pieces and put them and all other ingredients into
your bowl and mix together. Put in fridge for at least 1 hour before eating.
Haylee’s Note:
I knew looking at this recipe that it was going to be a good
one, and it did not disappoint! I had
heard of this cookie salad before, but this was my first time having it! I took it to a family party and it was a
HIT!! Everyone loved it! I kept seeing all of the kids sneaking back
for more and licking the bowl! Thanks
for the recipe Nikki!
Tuesday, August 28, 2012
Tyler Florence’s Blue Cheese Souffle with Fresh Figs and Honey
TYLER FLORENCE’S BLUE
CHEESE SOUFFLE WITH FRESH FIGS AND HONEY
3 tablespoons unsalted
butter, softened, plus more for greasing the ramekins
2 tablespoons sugar,
plus more for the ramekins
3 tablespoons
all-purpose flour
1 cup milk, warmed
5 eggs, separated
Pinch salt
Ground white pepper
Pinch ground nutmeg
1 cup crumbled blue
cheese
Pinch cream of tartar
8 fresh black mission
figs, split in 1/2 lengthwise
1/2 cup honey
Confectioners' sugar,
for dusting
Directions
Preheat the oven to
350 degrees F.
Prepare 4 (8-ounce)
ramekins by greasing them with softened butter and then coating them with
sugar, tapping out any excess.
Make a thick bechamel
sauce base by melting the 3 tablespoons of butter over low-medium heat in a
thick-bottomed pot. Just as the foam subsides, add the flour, stirring constantly
with a whisk to prevent lumps. Cook for 2 to 3 minutes to coat the flour with
fat and remove the starchy taste; do not allow the roux to brown. Add the warm
milk to the mixture and continue to whisk until smooth and thick. Remove from
the heat. Beat in the egg yolks 1 at a time. Season with salt, pepper, and
nutmeg. Stir in the cheese until incorporated evenly. Chill the mixture while
whipping the egg whites.
In a separate clean
bowl beat the egg whites and cream of tartar just until soft peaks form. Fold
1/3 of the beaten whites into the bechamel mixture to lighten it. Then gently
fold in the rest. Pour the batter into the prepared ramekins and place on a
cookie sheet. Bake on the middle rack for about 25 minutes.
The souffle is done
when it has puffed over the rim, the outside is golden, and the center jiggles
slightly.
Serve with fresh figs
and a drizzle of honey. Dust with confectioners' sugar.
Haylee’s Note:
This recipe was A LOT easier that I thought it was going to
be, and it turned out delicious! I was surprised
how well the sweet went with the blue cheese! I just wish I would have gotten a better picture right from the oven when it was even puffier! Now I just can’t wait to try a chocolate soufflé!
Wednesday, August 15, 2012
Chocolate Pistachio Baked Alaska
CHOCOLATE PISTACHIO BAKED ALASKA
One recipe brownies (CLICK HERE).
Pistachio Ice-cream (We used Ben and Jerry’s)
Meringue
4 large egg whites
1/4 teaspoon cream of tartar
1/4 teaspoon salt
1/2 cup sugar
Beat the egg whites, cream of tartar, and salt on high speed
in an electric mixer until soft peaks form. Beat in the sugar gradually in a
slow stream until stiff peaks form.
Use a round cookie cutter and cut brownies into individual servings.
Place on wax paper and freeze for at least 30
minutes.
Scoop pistachio ice-cream onto
brownie and freeze for another hour.
Make meringue and cover brownie and ice-cream completely. (You can spoon it on or pipe it using a
pastry bag). Freeze for at least 2 more
hours.
Place in a 500F oven until golden
brown or you can do it like the pros and torch it!
Serve immediately.
Haylee’s Note:
Baked Alaska has always been pretty intimidating to me, especially
because this was my first time making meringue.
It isn’t particularly hard, but it DOES take a long time. I think this would be a good dessert for
company though because everything is prepped and ready hours before. I did a second baked Alaska with mint
chocolate chip and I’m not sure which we liked better, they were both
excellent!
Tuesday, August 7, 2012
Tart Shells
½ c butter
½ c Crisco
1 c sugar
1 beaten egg
1 tsp almond extract
2 1/2 c flour
½ c Crisco
1 c sugar
1 beaten egg
1 tsp almond extract
2 1/2 c flour
Cream butter, Crisco, and sugar. Add the egg, extract and flour and cream to a nice soft dough. Roll the dough into walnut sized balls and then press into a tart shell.
Bake in a 375 oven for 8-10 minutes
Roll into walnut size 375 8-10 minutes
Haylee’s Note:
This is the ultimate “girl food.” It is dainty, it is
beautiful, and it is DELICIOUS! There
are so many ways you can fill these tarts.
My favorite it to fill the shell with a little dark chocolate, then fill
it with vanilla pudding with a little extra almond extract (but I think that
grand marnier would be AMAZING in this…if you use cooked pudding for all the Mormons
out there), then top with fresh berries and mint! Oh man!
SOO YUMMY!!
Thursday, July 12, 2012
Brown Bag Apple Pie (aka Best Apple Pie EVER)
BROWN BAG APPLE PIE (AKA BEST APPLE PIE EVER)
Crust:
1 1/2 c. flour
1 tsp. salt
2 tbsp. milk
1 1/2 tsp. sugar
1/2 c. oil
Mix with a fork and put into a large pie tin.
Filling:
4 c. sliced apples
2 tbsp. flour
1 tsp. cinnamon
1/2 c. sugar
1/2 tsp. nutmeg
Toss and mix the ingredients to distribute equally over the apples, then pour onto crust.
Topping:
1/2 c. sugar
1/2 c. flour
1/2 c. margarine
Mix sugar and flour then cut in margarine, crumble, and top the pie.
Put the whole pie into a brown sack (like a grocery brown paper bag) and bake for 1 hour and 45 mines at 350.
Haylee's Note:
I know that there are a lot of recipes out there that claim to be the "Best Apple Pie." But, they're not, THIS IS THE BEST APPLE PIE. Be forewarned, it isn't your traditional apple pie, but it IS the best. It is my Grandma Welling's recipe, and it is bound to be your favorite! Try it! It will not disappoint!
Tuesday, September 7, 2010
Sabayon
SABAYON
1 large cook vanilla pudding (not instant)
3 Tbsp Grand Mariner
8 oz cool whip or whip cream
Cook pudding according to directions then add grand mariner. Put plastic wrap over the bowl and let cool. When cool at the cream. Serve over vanilla bean ice-cream with fresh berries.
Haylee’s Note:
I REALLY love this dessert!! So much in fact that this is what we served at our wedding reception! If you want to make this recipe and exclude the grand mariner—don’t even bother making this recipe because the grand mariner makes the whole dessert!
Braided Heart
BRAIDED HEART
2 loaves Rhodes bread
cream cheese filling
1 small can pie filling
1 egg white
icing
Cream cheese filling:
3 oz. cream cheese
1 tbsp. butter
1/4 c. sugar
1 tsp. lemon juice
Icing:
1 c. powdered sugar
1 tbsp. butter
1/2 tsp. vanilla
2 tbsp. milk
Roll dough into a 12 x 30 in. rectangle (I never got mine this big. Just roll it into as large a rectangle as you want). Divide dough lengthwise into thirds (score the dough). Spread cream cheese filling in center followed by pie filling. Make cuts from filling to dough edges at 1 1/2-in. intervals. Alternating sides, fold strips at an angle across filling (I like to twist as I fold). Fold bottom end towards filling and finish by stretching last strips and tucking them under the bottom end.
Carefully lift onto a cookie sheet sprayed with non-stick cooking spray. Bring ends together forming a circle. With a knife, cut ends on an angle and join; put the circle into a heart shape. Place 3-4 glasses filled with water in the middle to help retain its shape as it rises.
Brush with egg white and cover with plastic wrap. Let rise until double. Remove wrap and bake at 350-degrees for 25-30 minutes. Remove from pan and let cool on rack. Drizzle with icing and decorate with fruit.
Haylee’s Note:
Darin’s Cousin Lisa made this for a baby shower I went to and it was SOOOO delicious!! We made it last week and loved it again!! I used a cherry pie filling and made it round instead of a heart! This recipe is a yummy dessert, breakfast or treat! Enjoy!
Carmel Cookie Ice-Cream Pie
CARMEL COOKIE ICE-CREAM PIE
3 c. crushed Vanilla sandwich cookies
5 vanilla sandwich cookies (chunks)—like ¼ of a cookie size.
1/2 c. butter
1/2 c Caramel
Caramel swirl ice-cream (softened)
Mix 1 ½ c. of the crushed vanilla sandwich cookies with 1/2 a cup of melted butter. Press the mixture down in the bottom of a 9x13 pan to form a crust. Next, spread the caramel swirl ice-cream over the crust. Place the cookie chunks throughout the ice-cream. Next pour the caramel evenly over the ice-cream. Top with the remaining crushed vanilla sandwich cookies. Freeze until solid and cut into squares. Or if using a spring form pan cut into triangles.
Haylee’s Note:
If you have ever had Winger’s Asphalt Pie, this is my mom’s caramel version of that classic! Every time I have ever made this, everyone always raves and they always think it is a lot more difficult than it really is!! I also really love this recipe because it is easy to play around with. You can do your chunks and crumbles finer or thicker depending on how you like it! I hope you enjoy this simple but delicious dessert
Red, White, and Blue Flag Cake
RED, WHITE AND BLUE FLAG CAKE
To make this cake you will need three full layers of white cake, all the same height (make two recipes of cake or two cake mixes - you will end up with four layers so use one for another purpose). One layer will need to be white, one layer will need to be red and one layer will need to be blue. Use food coloring to get desired shade. Bake the layers in 9" round greased and floured rounds. Let cool. Freeze the layers to make them easier to work with during assembly.
Assembly:
Split the white layer and the red layer in half horizontally using a long serrated knife. (You can also use a cake leveler to help keep the cut even.) Do not split the blue layer. Start assembly by placing one split white layer on a cake plate. Frost the top of this layer using white icing. Place one of the red split layers on top of the frosted white layer and frost it with icing. Set aside.
Place the remaining red split layer and the remaining white split layer on top of the full blue layer. Place a round bowl (or paper pattern) approximately 5" diameter on the top of the cakes in the center and cut through all the layers using the bowl as a guide. You should now have a circle cut through the layers. Keep the center red circle, the center white circle and the outer (approximately 2" wide) blue cake ring. Set aside all other cake pieces for a different use.
Place the outer blue cake ring piece on the iced white and red cake layers. Carefully spread icing around the inside of the blue ring.
Insert the round white cake piece in the center of the blue ring and ice. Insert the red round cake piece making sure it is flush with the blue cake ring.
You should now have a complete cake ready to ice. Finish by icing the entire cake with white icing and decorating as desired.
To serve, cut into slices and be amazed at the cool flag each piece becomes!
Haylee’s Note:
I got this recipe from Studio 5, and they got the recipe from here This was a really fun cake to make! Hope you enjoy it! Oh, and here is a little video that my bro-in-law took when we sliced it open!
Subscribe to:
Posts (Atom)